Item Templates, Saving You Time in Visual Studio

Item Templates

As software developers who spend a large majority of our time in front of our IDE, it makes sense to optimize it’s settings to meet our specif needs. Changing just a few small things can have dramatic time savings over the long run if we are constantly having to do them over and over again. I am going to primarily focus on Visual Studio item templates. Every time you hit shift+alt+c to add a new class file or right click on a project and choose “Add->New Item…” this gives you the ability to select a pre-canned/starter file. These files contain the same boring and repetitive skeleton code to get that type of item started. Imagine having to type out all your usings, namespace, and class declarations every time you need to create a new class. Item templates are a great productivity booster!

Ya, And?

So you are probably saying to yourself, so what, every one knows about these and have been using them forever. What if you don’t like the pre-canned ones? What if you love them and wish they were just slightly different? What if you wanted your own custom, perhaps multi-file item templates? I am sure many of you have downloaded other item templates that come with extensions or even as standalone templates from the Visual Studio Gallery. Today I am going to show you how you can modify existing item templates or create your own.

If Only It Had…

If I had to guess, I would venture to say that, the most common item template for a C# developer is the Class item template. One way we can possibly improve on this template is to make the class public. I am almost always having to do this manually, and it bothers me. You could also make it default to internal if you feel safer that way.

OK, lets enhance the default one. The default class item template is installed at “C:\Program Files (x86)\Microsoft Visual Studio 12.0\Common7\IDE\ItemTemplates\CSharp\Code\1033\Class”, the location should only vary based on the Visual Studio version you are using, I currently am using 2013. Inside of this folder are two files Class.cs and Class.vstemplate. The .cs file is a template filled with parameters that Visual Studio will replace when you choose it through adding a new item. This is the main file we care about, here we can add the public key word in front of class. Lets say we want a default public constructor as well. Lets also remove the use of System.Threading.Tasks using statement, since 90% of the time I don’t need that. Now we end up with a file that looks like this:

using System;
using System.Collections.Generic;
$if$ ($targetframeworkversion$ >= 3.5)using System.Linq;
$endif$using System.Text;
 
namespace $rootnamespace$
{
    public class $safeitemrootname$
    {
        public $safeitemrootname$()
        {
        }
    }
}

(To edit this file you need admin rights, also if you try and use it after editing, it may not take your changes right away, as VS does some caching of these files. Some of the times I had to copy the .cs file into “C:\Program Files (x86)\Microsoft Visual Studio 12.0\Common7\IDE\ItemTemplatesCache\CSharp\Code\1033\Class” to see it immediately, I am not sure when VS updates this cache location on its own.)

Now when we add a new class, we get the following:

using System;
using System.Collections.Generic;
using System.Linq;
using System.Text;
 
namespace ClassLibrary1
{
    public class MyNewClass
    {
        public MyNewClass()
        {
 
        }
    }
}

In the template file, you will notice all the $parameter$’s that are filled in by VS when adding a new item. A list of all the ones available can be found at https://msdn.microsoft.com/en-us/library/eehb4faa.aspx. You can do all kinds of fun things with these. Some companies I have worked for have headers at the top of all their files. These headers have things like copy write information, the date and time that the file was created, and the user who created the file. All this stuff can be pre-populated using some of the available parameters.

 You Promised Multiple Files!

So far I have shown you how the template files can be created and how to edit existing ones. What if you love the current ones and want to create your own additional ones? Now I know there are even cooler things that can be done with scaffolding, that are much more complex, but I am not going to get into those here.

I often find myself creating an entity then a repository for that entity along with an interface for the repository. My entity always has things like an Id that I can include in a custom item template. My repository is always named EntityNameRepository and implements IEntityNameRepository. Some times I also need an angular service and MVC controller for that entity as well. These types of scenarios are a perfect use cases for item templates. Since I already demonstrated how to work on the template file, here I will show you how to create a new item template package with multiple files.

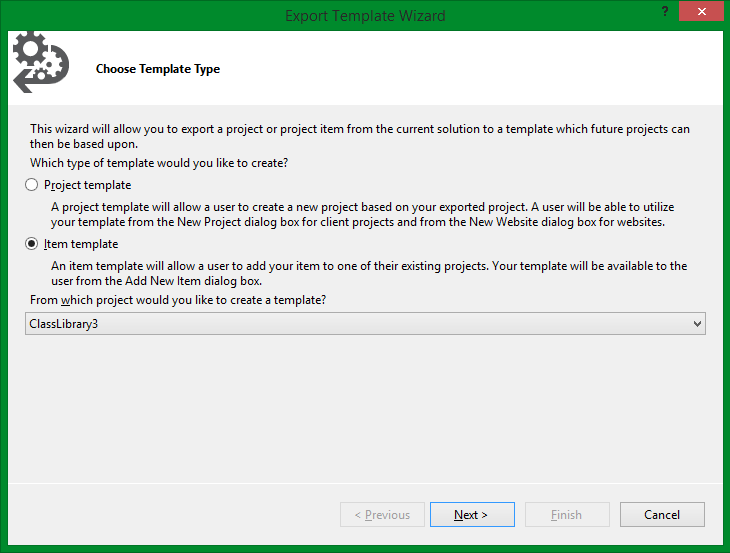
To start, open up any type of new project in visual studio or existing one, I used a class library. Fill out all the template files you will want, in my case I created two files one called Class.cs and the other Repository.cs, don’t worry their names will be overridden later on. After you have your skeleton code and $parameters$ in place you are ready to export. In Visual Studio clicking File -> Export Template will bring up the Export Template Wizard.

Select Item Template

Select “Item template” and from which project you want to export from. Clicking “Next” will take you to a page in which you can select the file you want as a template, unfortunately you can only pick one from this dialog, don’t worry we just have to manually add the others. After selecting a file and clicking next you will be able to select what assemblies you want included when adding the template, for our case none. The following screen is a result of clicking “Next” and allows you to fill in info that will be displayed on the add new item dialog.
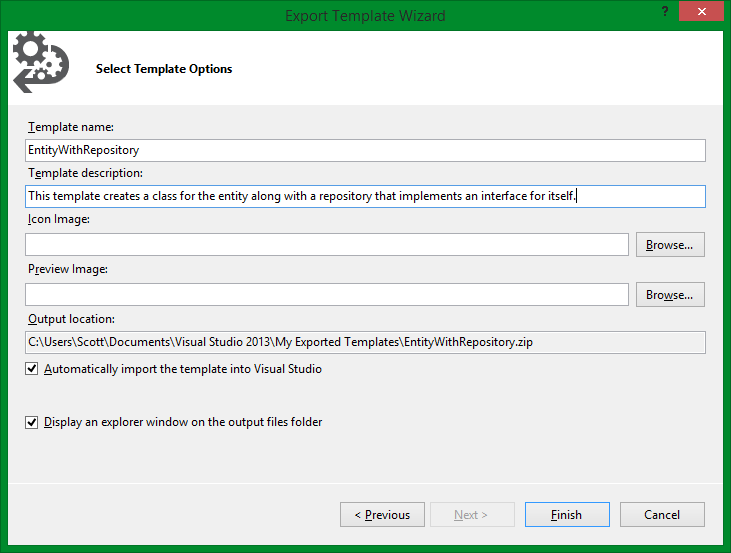
Export Options for your Item Template

As you can see there are several options like including an icon, output directory and if you want it imported automatically. We are going to have to manually edit a few things and re-import anyway. The output of this the export is a .zip file that contains all the files needed. Unzip this folder and add any template files that are missing. Next edit the MyTemplate.vstemplate file to include the missing files that you just copied into this folder. Use the existing ProjectItem node as a reference and change the file names accordingly.

<VSTemplate Version="3.0.0" xmlns="http://schemas.microsoft.com/developer/vstemplate/2005" Type="Item">
  <TemplateData>
    <DefaultName>EntityWithRepository.cs</DefaultName>
    <Name>EntityWithRepository</Name>
    <Description>This template creates a class for the entity along with a repository that implements an interface for itself.</Description>
    <ProjectType>CSharp</ProjectType>
    <SortOrder>10</SortOrder>
    <Icon>__TemplateIcon.ico</Icon>
  </TemplateData>
  <TemplateContent>
    <References />
    <ProjectItem SubType="Code" TargetFileName="$fileinputname$Repository.cs" ReplaceParameters="true">Repository.cs</ProjectItem>
    <ProjectItem SubType="Code" TargetFileName="$fileinputname$.cs" ReplaceParameters="true">Class.cs</ProjectItem>
  </TemplateContent>
</VSTemplate>

You can see that the new file names will be the one input on the add new item dialog and the Repository word will be appended for the repository file. Next just zip up the new contents. (A word of caution, clicking on the parent folder and using “Send To->Compressed Folder” adds an extra folder in between which will not work. I selected all the files and then zipped those up instead.) Now all you need to do is replace the originally created .zip file with the new one at “C:\Users\<Your User Name>\Documents\Visual Studio 2013\Templates\ItemTemplates”, this is where Visual Studio will look for custom item templates. Now you should be able to use your new item template. (Visual Studio may need to be restarted to show up.)

Use the new Item Template from the Add New Item dialog

Using the new item template will yield two shinny new files using the name you specified!

But Wait, There’s More

There are also Project Templates that you can create that will give you tons of different files, make sure you have all the right references and even create multiple projects. So for example if you always create an MVC project, import your favorite assemblies, use a certain folder structure, have an additional model, data access, or test projects, you can!

So now you are thinking, this all sounds great, but that sounds like a ton of work, isn’t there some pre-made stuff? The answer of course is yes! John Papa and others maintain an open project called SideWaffle which contains all kinds of  commonly used project and item templates that can either work for you or start as a basis for your own modifications.

Let me know in the comments or on twitter @ScottKerlagon about templates you use to save time or ideas on new templates!

Logging, Better to Have It, Before You Need It

Motivation for Logging

Logging is the one thing you don’t know you need until you need it. I’m sure many of us have all been in the situation in which you wish you knew what your program was doing in a production environment. If only you could set a break point to check all of your variables and figure out why you can’t recreate it on your machine. One of the best solutions to this situation is logging! Good logging can often help you know exactly why that exception occurred. You can write logs as granular as you need. You can even set logging up so that different levels are logged based on a setting, either from a web.config file or a database. Some the reasons I can think of off the top of my head are:

  • Debugging purposes
  • Auditing user access
  • Performance metrics
  • Usability assessment
  • Supplement to commenting your code

I stumbled across another blog by Erik Hazzard in which he goes into more detail about why logging is important. vasir.net/blog/development/how-logging-made-me-a-better-developer

Today I am going to show you my simple logging and audit solution. I know there are many enterprise level logging solutions out there, such as Log4Net, but those are over kill for my needs and writing this takes just as much time as integrating a third party framework. I am using Entity Framework with my ASP.NET MVC project. I am also using Unity for dependency injection, in case the usage below is unclear. I wanted an easy way to be able to write log entries and automatically collect information on my controllers and their actions with the minimum amount of effort. My project has three main layers. The model layer, where I keep all my entities and class that describe my domain. The data layer keeps all my repositories and contexts for actually writing and saving data, it does a nice job of decoupling my data access from the rest of my code. My last main layer is the actual MVC project that contains all of my controllers, HTML and JavaScript.

Model/Entity

Here I have a simple log entry object, which has the properties that I am most interested in logging.

public class LogEntry
{
    public int Id { getset; }
    public string UserName { getset; }
    public string Message { getset; }
    public string Controller { getset; }
    public string Action { getset; }
    public string IP { getset; }
    public DateTime DateTime { getset; }
    public LogType LogType { getset; }
}
 
public enum LogType
{
    ControllerAction,
    UserEvent,
    EntityFrameWork,
    Exception
}

Here you can see I want to track things like the user who is logged in, the name of the current controller and action, the date and time, a message, and what type of log event this is. Nice and simple! It will be easy to add more properties in the future if I have a need for extra information.

Data Layer

Here is my simple context which Entity Framework’s code first will use when creating the LogEntries table. The LogEntryConfiguration simply sets the Id as required, so I am not going show that here.

public class LoggingContext : DbContext
{
    public LoggingContext()
        : base("DefaultConnection")
    {
    }
 
    public DbSet<LogEntry> LogEntries { getset; }
 
    protected override void OnModelCreating(DbModelBuilder modelBuilder)
    {
        modelBuilder.Configurations.Add(new LogEntryConfiguration());
    }
}

In my data layer I have a repository for logging that allows me to do CRUD like operations. The interface allows me to decouple the consuming code from the actual implementation of the logging. This will make changing to some other logging mechanism, such as writing to a text file or another database, a piece of cake, as none of the calling code will have to change.

public interface ILogEntryRepository
{
    IEnumerable<LogEntry> GetAllLogEntries();
    IEnumerable<LogEntry> GetAllLogEntriesForLogType(LogType logType);
    IEnumerable<LogEntry> GetAllLogEntriesForLogTypeInDateRange(LogType logType, DateTime startDate, DateTime endDate);
    IEnumerable<LogEntry> GetAllLogEntriesInTimeRange(DateTime startDate, DateTime endDate);
    LogEntry InsertLogEntry(LogEntry logEntry);
    void LogMessage(string message);
}

Below is the interface I defined that my log entry repository implements. I have several methods for viewing and filtering log entries that I use on a dashboard. The main method, which we are concerned about here, is the InsertLogEntry method. This method simply takes a LogEntry and saves it to the database. I am injecting the LoggingContext in through my constructor and am using that instance in all my methods for database communication. As you can see the code is simple and straight forward.

public class LogEntryRepository : ILogEntryRepository
{
    private LoggingContext context;
    public LogEntryRepository(LoggingContext context)
    {
        this.context = context;
    }
 
    public IEnumerable<LogEntry> GetAllLogEntries()
    {
        return context.LogEntries.OrderByDescending(x => x.DateTime).ToList();
    }
 
    public IEnumerable<LogEntry> GetAllLogEntriesForLogType(LogType logType)
    {
        return context.LogEntries.Where(x => x.LogType == logType).OrderByDescending(x => x.DateTime).ToList();
    }
 
    public LogEntry InsertLogEntry(LogEntry logEntry)
    {
        logEntry = context.LogEntries.Add(logEntry);
        context.SaveChanges();
        return logEntry;
    }
 
    public void LogMessage(string message)
    {
        LogEntry logEntry = new LogEntry()
        {
            Message = message,
            DateTime = DateTime.Now,
            LogType = LogType.EntityFrameWork
        };
        context.LogEntries.Add(logEntry);
        context.SaveChanges();
    }
 
    public IEnumerable<LogEntry> GetAllLogEntriesForLogTypeInDateRange(LogType logType, DateTime startDate, DateTime endDate)
    {
         return context.LogEntries.Where(x => x.LogType == logType && x.DateTime.Date <= endDate.Date && x.DateTime.Date >= startDate).OrderByDescending(x => x.DateTime).ToList();
    }
 
    public IEnumerable<LogEntry> GetAllLogEntriesInTimeRange(DateTime startDate, DateTime endDate)
    {
        return context.LogEntries.Where(x => x.DateTime.Date <= endDate.Date && x.DateTime.Date >= startDate).OrderByDescending(x => x.DateTime).ToList();
    }
}

MVC Project/Consumer

One place where I consume my logging repository, is in a custom ActionFilter. This ActionFilter automatically logs any time a controller’s action is entered. This filter just populates a LogEntry object in the OnActionExecuting method, which fires when a method on a controller is hit. My filter is making use of Setter Injection using the [Dependency] attribute that comes with Unity, my IoC container, to set my LogEntryRepository. After creating a LogEntry object all I need to do is call my repository and insert the log entry.

public class LogFilter : ActionFilterAttributeIActionFilter
{
     [Dependency]
     public ILogEntryRepository LogEntryRepo { getset; }
 
     void IActionFilter.OnActionExecuting(ActionExecutingContext filterContext)
     {
         LogEntry log = new LogEntry()
         {
             UserName = filterContext.HttpContext.User.Identity.Name,
             Controller = filterContext.ActionDescriptor.ControllerDescriptor.ControllerName,
             Action = filterContext.ActionDescriptor.ActionName,
             IP = filterContext.HttpContext.Request.UserHostAddress,
             DateTime = DateTime.Now,
             LogType = LogType.ControllerAction
         };
 
         LogEntryRepo.InsertLogEntry(log);
 
         this.OnActionExecuting(filterContext);
     }
}

All I have to do is decorate a controller/action method with this LogFilter attribute and presto, detailed information is logged to the database. What could be less painful?

[LogFilter]
public class ItemController : Controller
{

The Output

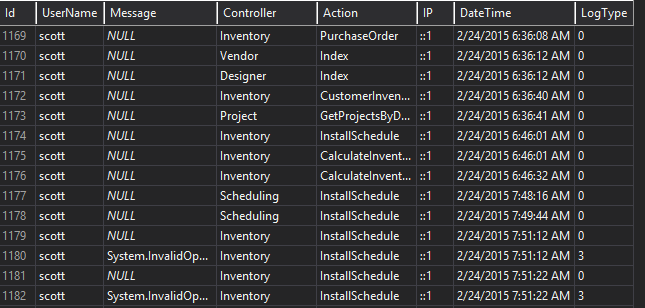
Here is an image of my SQL database after running through my application. Near the bottom, you can see two log messages that are the result of exceptions being triggered. The entry contains the exception message and the LogType is set to 3, based on my enumerations. All of the IP’s are shown as ::1 because I was running locally.

Database Logging

I hope you found this solution helpful and/or inspiring to help you create or expand on your own logging implementation. I would like to know about the logging solutions you are currently using and when it has come in handy the most. Let me know in the comments or on Twitter @ScottKerlagon!

Also let me know if you would like me to cover some of the concepts I used such as dependency injection and the repository pattern in future posts.

John Sonmez’s Create a Blog Course Review

I, like many software developers, have always toyed with the idea of starting a blog, mainly for the nerdy side of it like setting up a site and having fun with all the stats and plugins and such. However, the introvert in me always held me back, saying things like “I could never have anything useful to contribute”, “I can’t write well enough”, or “Someone else has probably written that before”. Over the past year, I have come to realize that writing code is only a very small subset of being a software developer. A software developer has to have many other skills in order to succeed. Some of these skills are things like organization, good communication skills, the ability to understand complex problems, and communicate those effectively to others and so on. Most of these types of skills are the ones that programmers tend to shy away from because they are difficult and uncomfortable. However, from writing code and learning new concepts and languages, the only way to learn them is by actually doing and putting them into practice. I can watch hours upon hours of how-to videos and read countless blogs on a topic, but until I put them to use I don’t really have those skills. This is why I have started to blog, to help me acquire those, often hard to master, type skills mentioned above.

Create a Blog Email Course

John Sonmez has a very successful blog at http://simpleprogrammer.com that I have been following for some time. On that blog he promoted a free 3 week email course on how to create a blog to boost your career http://devcareerboost.com/blog-course/. When I stumbled across this post of his, I was intrigued and wanted to know what a course on blogging would contain. I signed up for the course without really having the intention of blogging and more just to learn. But after the first few emails, I was convinced of the possible benefits that blogging could bring me. John said that it had opened many opportunities for him from being asked to speak and give classes, to being able to work for himself, and make a lot more money doing so. All this he attributes to having a blog and getting his name and personal brand out there.

About the Course

The number one thing that got me excited to try this out, was a story that John tells in his first email of the course. In short, he went for an interview and the interviewer knew who he was because he had read his blog and was given an offer much larger than he expected. John wasn’t interviewed in the traditional sense of being asked a bunch of technical questions and personality tricks. I don’t know about the rest of you but, I hate interviews because of all the questions I get asked. Not because they are hard, but because of nerves and just being on the spot. I figure that writing a blog will not only help in answering questions in a clear and concise way, but because I will have answered some of them on this blog! Adding the possibility of having the interviewer know who you are, what can top that? At the very least, when an interviewer asks a question you can answer with something like “Oh, I wrote a blog post on that!”. Imagine what the interviewer would think hearing that from a candidate. They would probably be shocked and know that you really care about the topic if you wrote a post on it. They would know you have good communication skills. They would look at you as some level of expert (even if you’re not!). I’m sure there are many other positive things your potential employer would think and all of which will help you get an offer. That’s amazing! This is the part that really sold me. Not to mention the other benefits John outlines in his course.

The course is 3 weeks long and 2 emails are sent out each week. Each email has advice and motivation for the particular lecture. Some really insightful and thoughtful instructions on how to get started blogging. Each of the lectures has some little homework assignment to actually get you to action. Now I know what you are thinking, homework?!?! Honestly, they are not difficult and are just enough for you to be able to accomplish something in a small, yet meaningful way. One assignment is merely to come up with a theme for your blog. If you are already considering blogging, you probably already have several ideas. All of these little steps at the end will leave you with an up and running blog and lots of ideas to keep you going.

The course has the following topics:

  1. A blog that boosts your career
  2. The Most Important Thing For a Successful Blog
  3. Creating Your Blog
  4. The Next Step Is…‏ (What to do after you have a physical site up)
  5. Time to Get Serious!‏
  6. Do You Know How to Get Traffic For Your Blog?

Each of these email lectures gently carries you along the path of getting to the point of posting your first post and having you set up to make it a habit. Most courses (for many other topics) lay the foundation for only the first few steps and leave you scratching your head asking yourself, “Well, now that I have this shiny thing what is next?”. John does an excellent job of setting you up for long-term success by having you create a long list of potential blog post ideas being always available, committing to a certain time and pace to post, and how to grow an audience.

I recommend this course to anyone who has the faintest desire to improve themselves in any field. You don’t have to blog about technical topics or software development to get use out of this course. The act of blogging can help you in whatever career you are in by giving you those soft skills that apply everywhere as well as learning about the theme you choose!